使用 Docker 快速上手官方版 LLaMA2 开源大模型 - 脉脉
本篇文章,我们聊聊如何使用 Docker 容器快速上手 Meta AI 出品的 LLaMA2 开源大模型。
写在前面
昨天特别忙,早晨申请完 LLaMA2 模型下载权限后,直到晚上才顾上折腾了一个 Docker 容器运行方案,都没来得及写文章来聊聊这个容器怎么回事,以及怎么使用。
所以,现在就来聊聊如何快速上手 LLaMA2 官方版本的大模型。

Docker LLaMA2 Chat 开源项目
完整的开源项目代码,我上传到了 [https://github.com/soulteary/docker-llama2-chat),有需要的同学可以自取。
先来一起做下准备工作吧。
准备工作
准备工作中,主要有两步:准备模型文件和模型运行环境。
只要你安装好 Docker 环境,配置好能够在 Docker 容器中调用显卡的基础环境,就可以进行下一步啦。
模型下载
想要愉快的进行 LLaMA2 的本地部署,我们首先需要申请模型文件的下载许可,目前一共有两个地方可以申请:Meta AI 官方网站和 Meta 在 HuggingFace 的模型页面。
•https://ai.meta.com/llama/•https://huggingface.co/meta-llama
不论选择哪一种方式,在申请之后,稍等片刻,我们都将收到审核通过邮件,然后刷新页面,就可以进行模型下载啦。

模型下载许可通过的通知邮件
HuggingFace 的模型下载速度比 Meta AI 官网快一些,所以我们侧重聊如何从 HuggingFace 准备我们所需要的模型。
从 HuggingFace 获取模型文件
我们能从 HuggingFace 上获取到的模型一共有两种模型(原始基础模型和 Chat 模型);以及在 HuggingFace 平台上,它们分别被保存为了两种格式:PyTorch Pickle 格式和 HuggingFace [SafeTensors 格式[3]]("SafeTensors 格式")。
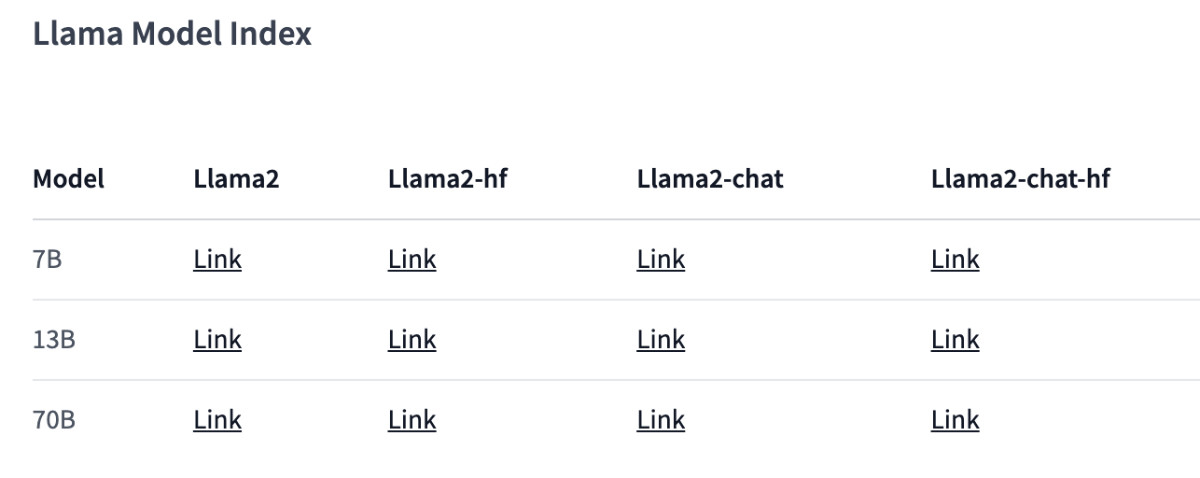
LLaMA2 模型列表
如果你也使用 HuggingFace 全家桶,我强烈推荐后一种格式:面向未来,方便可靠,加载性能也更强(快)。
为了方便演示和得到一个还凑合的体验效果,本文中,我们采用 “LLaMA2-Chat-HF” 版本的模型,你可以在下面的地址申请模型下载授权:
•https://huggingface.co/llamaste/Llama-2-7b-chat-hf
•https://huggingface.co/llamaste/Llama-2-13b-hf
•https://huggingface.co/llamaste/Llama-2-70b-hf
其中 7B 和 13B 版本的模型,我们能够在普通家用显卡中跑起来(大概使用 10G~14G显存)。
当下载授权审核通过之后,我们可以使用下面的命令,来分别根据你的需求下载下面的三个模型:
# 本地需要按照 Git LFS,https://git-lfs.com
# 安装完毕,进行初始化
git lfs install
# 下载 7B 模型
git clone https://huggingface.co/meta-llama/Llama-2-7b-chat-hf
# 下载 13B 模型
git clone https://huggingface.co/meta-llama/Llama-2-13b-chat-hf
# 下载 70B 模型
git clone https://huggingface.co/meta-llama/Llama-2-70b-chat-hf
等待我们选择的模型下载完后,调整下目录结构:
# 创建一个新的目录,用于存放我们的模型
mkdir meta-llama
# 将下载好的模型移动到目录中
mv

Llama-2-7b-chat-hf meta-llama/
mv

Llama-2-13b-chat-hf meta-llama/
mv

Llama-2-70b-chat-hf meta-llama/
完整的目录结构类似下面这样,所有的模型都在我们创建的 meta-llama 目录的下一级中:
# tree -L 2 meta-llama
meta-llama
├──

Llama-2-13b-chat-hf
│

├── added_tokens.json
│

├── config.json
│

├── generation_config.json
│

├── LICENSE.txt
│

├── model-00001-of-00003.safetensors
│

├── model-00002-of-00003.safetensors
│

├── model-00003-of-00003.safetensors
│

├── model.safetensors.index.json
│

├── pytorch_model-00001-of-00003.bin
│

├── pytorch_model-00002-of-00003.bin
│

├── pytorch_model-00003-of-00003.bin
│

├── pytorch_model.bin.index.json
│

├── README.md
│

├──

Responsible-Use-Guide.pdf
│

├── special_tokens_map.json
│

├── tokenizer_config.json
│

├── tokenizer.model
│

└── USE_POLICY.md
└──

Llama-2-7b-chat-hf


├── added_tokens.json


├── config.json


├── generation_config.json


├── LICENSE.txt


├── model-00001-of-00002.safetensors


├── model-00002-of-00002.safetensors


├── model.safetensors.index.json


├── models--meta-llama--Llama-2-7b-chat-hf


├── pytorch_model-00001-of-00003.bin


├── pytorch_model-00002-of-00003.bin


├── pytorch_model-00003-of-00003.bin


├── pytorch_model.bin.index.json


├── README.md


├── special_tokens_map.json


├── tokenizer_config.json


├── tokenizer.json


├── tokenizer.model


└── USE_POLICY.md
上面的内容都准备好后,我们开始准备运行模型。
启动模型应用程序
使用下面的命令,下载模型应用程序文件:
git clone https://github.com/soulteary/docker-llama2-chat.git
等待程序下载完毕后,我们进入程序目录,然后开始构建我们所需要的模型容器镜像:
# 进入程序目录
cd docker-llama2-chat
# 构建 7B 镜像
bash scripts/make-7b.sh
# 或者,构建 13B 镜像
bash scripts/make-13b.sh
耐心等待镜像构建完毕后,我们将之前准备好的存放着模型的 meta-llama 目录,移动到当前程序目录中,然后选择要启动的模型程序即可:
# 运行 7B 镜像,应用程序
bash scripts/run-7b.sh
# 或者,运行 13B 镜像,应用程序
bash scripts/run-13b.sh
命令执行后,如果一切顺利,你将看到类似下面的日志:
=============
==

PyTorch

==
=============
NVIDIA Release

23.06

(build 63009835)
PyTorch

Version

2.1.0a0+4136153
Container image Copyright
接着,我们使用浏览器打开 http://localhost:7860 或者 http://你的IP:7860 就能够开始体验 LLaMA2 Chat 模型啦。
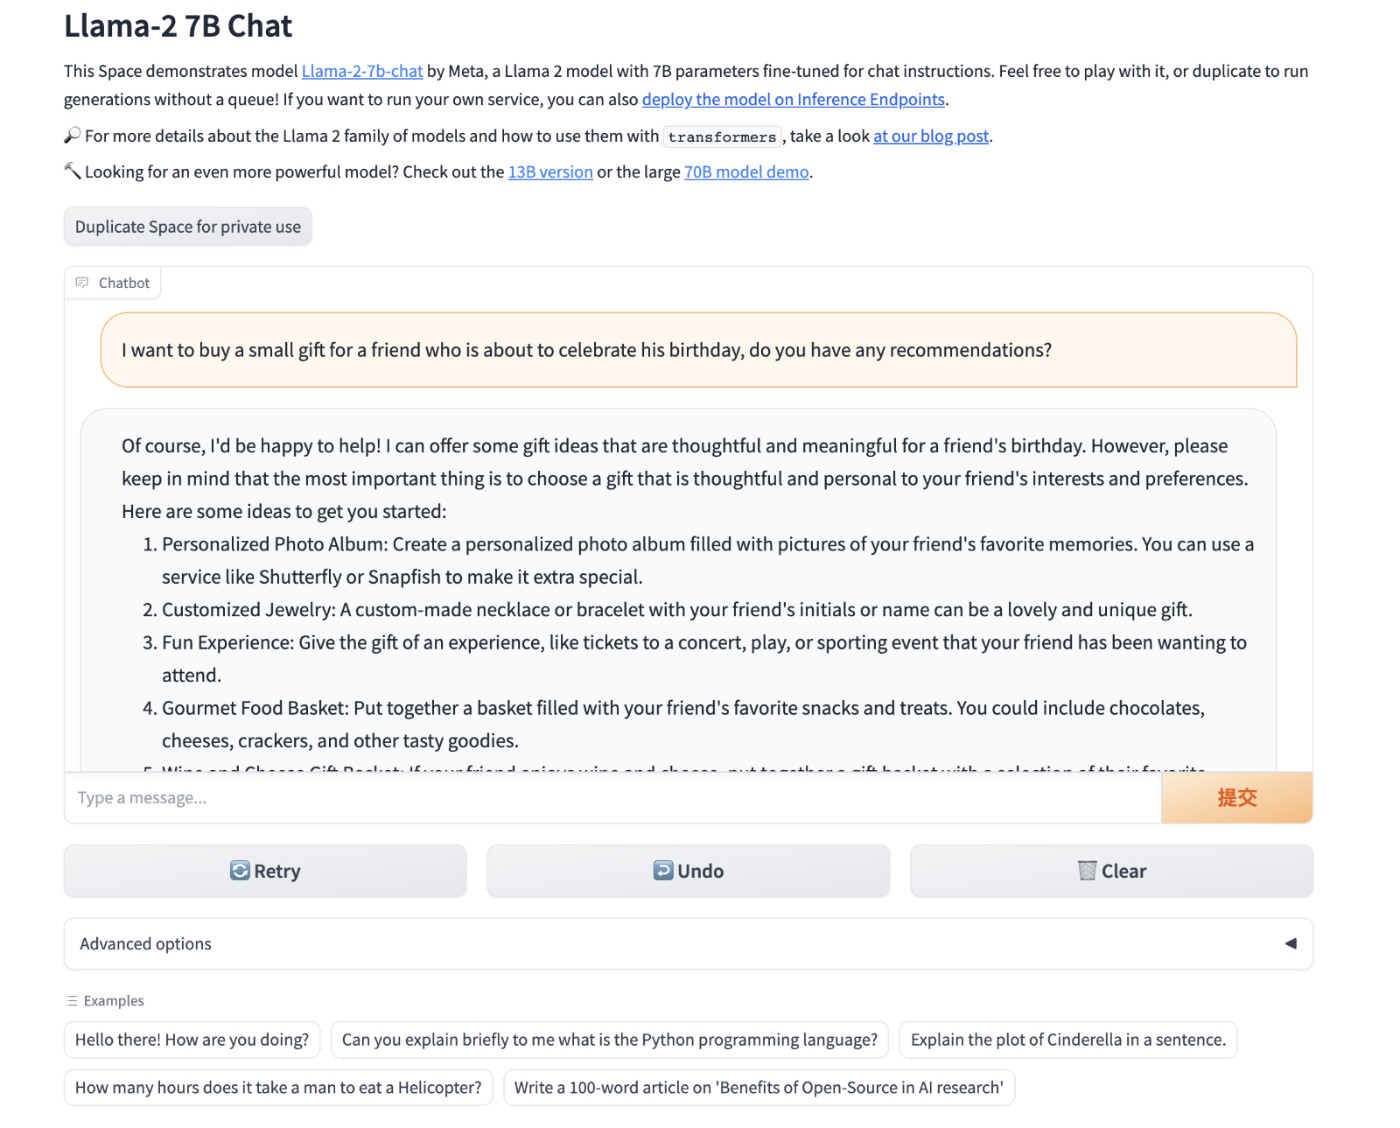
使用官方 Example 跑起来的模型应用
显存使用情况
7B 模型实际运行起来,会占用 13 G 左右显存。
13B 模型运行起来,消耗显存 9G 左右。
好了,如果你只想了解如何使用模型,那么到这里就足够啦。
模型镜像的封装
接下来,我们来简单展开下上面的脚本中,都做了哪些工作。
封装这个 LLaMA2 Docker 镜像其实特别简单,和之前的模型相关的文章没有差别,我们基于 [Nvidia 基础镜像[5]]("Nvidia 基础镜像"),做一个简单的多阶段构建即可。https://docs.nvidia.com/deeplearning/frameworks/pytorch-release-notes/rel-23-03.html
比如,我们可以先定义一个基础镜像,包含所有的模型程序运行需要的依赖文件:
ROM nvcr.io/nvidia/pytorch:23.06-py3
RUN pip config set

global.index-url https://pypi.tuna.tsinghua.edu.cn/simple && \
    pip install accelerate==0.21.0 bitsandbytes==0.40.2 gradio==3.37.0 protobuf==3.20.3 scipy==1.11.1 sentencepiece==0.1.99 transformers==4.31.0
WORKDIR /app
然后,我们将上面的内容保存为 Dockerfile.base,接着使用 docker build -t soulteary/llama2:base . -f docker/Dockerfile.base 进行基础镜像的构建。
接着,我们准备好模型调用文件即可,相关的程序我上传到了 [soulteary/docker-llama2-chat/llama2-7b[6]](https://github.com/soulteary/docker-llama2-chat/tree/main/llama2-7b) 和 [soulteary/docker-llama2-chat/llama2-13b[7]](https://github.com/soulteary/docker-llama2-chat/tree/main/llama2-13b),主要有两个文件构成,分别是 Gradio Web 交互界面,和模型加载运行程序。
编写模型应用程序镜像文件:
FROM soulteary/llama2:base
COPY llama2-7b/* ./
CMD ["python", "app.py"]
将上面的文件保存为 Dockerfile.7b 后,我买使用命令 docker build -t soulteary/llama2:7b . -f docker/Dockerfile.7b 完成应用镜像的构建。
最后,使用下面的命令,将程序跑起来就可以玩啦:
docker run --gpus all --ipc=host --ulimit memlock=-1 --ulimit stack=67108864 --rm -it -v `pwd`/meta-llama:/app/meta-llama -p 7860:7860 soulteary/llama2:7b
最后
本篇文章是 LLaMA2 相关的第一篇文章,短短几个月的时间,开源项目就能够取得这么快速的进步,还是挺令人欣慰和令人期待的。
LLaMA2 不是结束,而是新一轮的开始,开源的世界里,我们永远可以期待更强的家伙出现,不断逼进和挑战当前世界的王。
这篇文章的标题里隐藏着下一篇文章的线索,你猜得到吗?
--EOF
引用链接
[1] soulteary/docker-llama2-chat: https://github.com/soulteary/docker-llama2-chat[2] 基于 Docker 的深度学习环境:入门篇: https://soulteary.com/2023/03/22/docker-based-deep-learning-environment-getting-started.html[3] SafeTensors 格式: https://github.com/huggingface/safetensors[4] Docker LLaMA2 Chat: https://github.com/soulteary/docker-llama2-chat[5] Nvidia 基础镜像: https://docs.nvidia.com/deeplearning/frameworks/pytorch-release-notes/rel-23-03.html[6] soulteary/docker-llama2-chat/llama2-7b: https://github.com/soulteary/docker-llama2-chat/tree/main/llama2-7b[7] soulteary/docker-llama2-chat/llama2-13b: https://github.com/soulteary/docker-llama2-chat/tree/main/llama2-13b


上篇:
chatglm3-6b+oneapi+fastGPT本地部署
下篇:
如何打造属于你的定制化大模型聊天机器人
1 用AI全流程制作历史故事短剧,保姆级教程,零基础上手 2 2025年AI大模型六大行业风口 3 vLLM + FastAPI:一个高并发、低延迟的Qwen-7B量化服务搭建实录... 4 Vaex :十亿行每秒的 Python 大数据神器,探索与可视化的新标杆 5 大模型无非就这点东西 6 controlnet-canny, controlnet-depth 场景介... 7 AI推理: 引导尺度, 采样步数, 采样偏移 8 使用MCP+Neo4j零代码构建自己的知识图谱 9 2025年性价比最高的AI服务器拆解:768GB显存暴打训练慢的痛点 10 AIGC高阶教程:用即梦AI提示词榨干模型创作力 11 橘猫生活场景视频制作教程简单好上手 12 微信官方工具,免费提取视频号爆款文案,并AI改写