说明
注意!!!:如果你有单独的服务器用来部署engine,本文章不适合你,如果虽然你只有一台服务器但是能部署成功hostedengine,本文章同样不适合你!推荐的部署方式仍是hostedengine或engine单独部署。
本文描述的是使用单台主机Allinone方式部署oVirt4.4的方法,安装host采用的是官方node iso的方式,安装engine采用的是dnf(yum)的方式;
engine采用dnf(yum)安装部署的原因是很多同学反馈hostedengine部署经常遇到问题,dnf(yum)安装的话基本不会遇到稀奇古怪的问题;
注意Allinone单台主机部署注定engine不能实现HA(高可用),但主机host可以添加多台;
环境准备
一台物理机或虚拟机,配置不低于4核/8G/300G;
注:本文为了截图方便,是在一台Centos8.2系统上通过virt-manager创建了一个虚机环境中部署的;
部署过程
第一步,通过oVirt node iso安装host
从本站【安装包下载】页面或其它渠道获取到oVirt4.4版本的node iso,本次部署使用的是ovirt-node-ng-installer-4.4.1-2020080418.el8.iso;
使用node iso通过cd引导准备好的物理机或虚拟机;
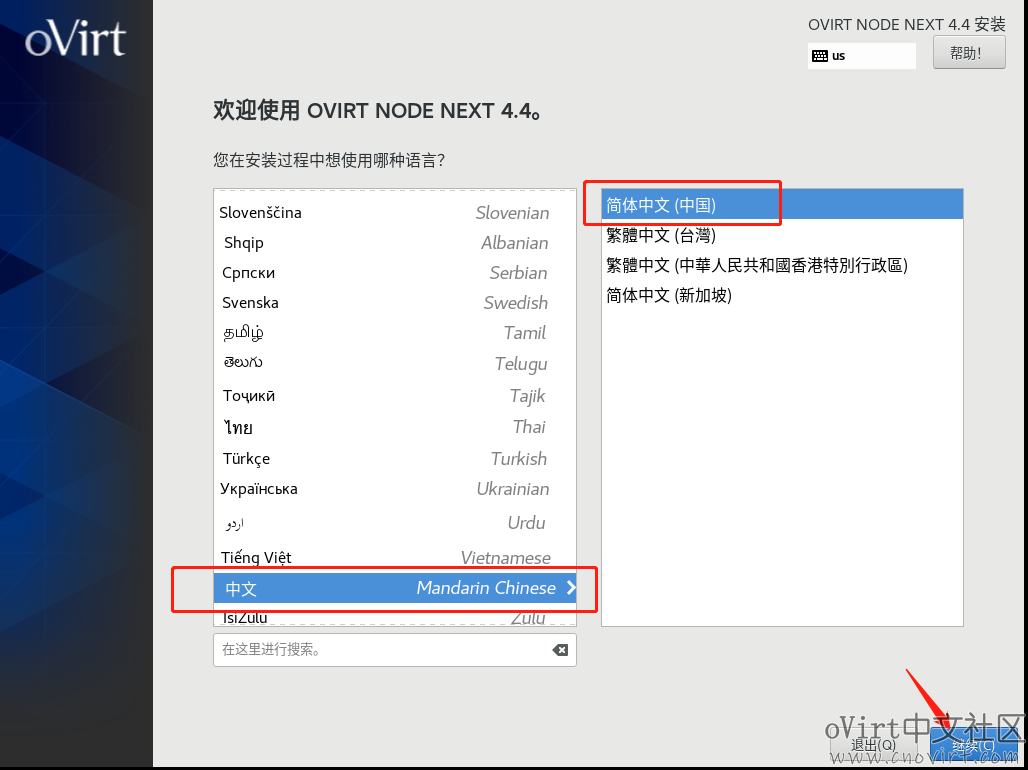
选择语言;
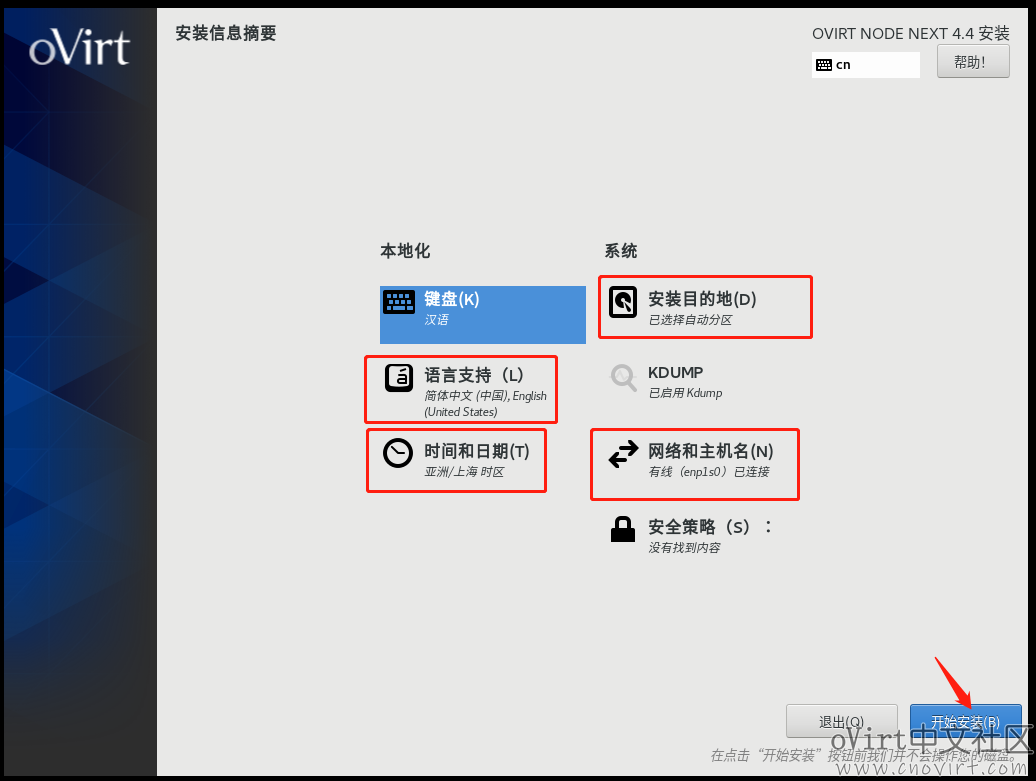
注意配置语言、时间、安装磁盘位置、网络和主机名;(磁盘如果用过了注意要手动回收空间)
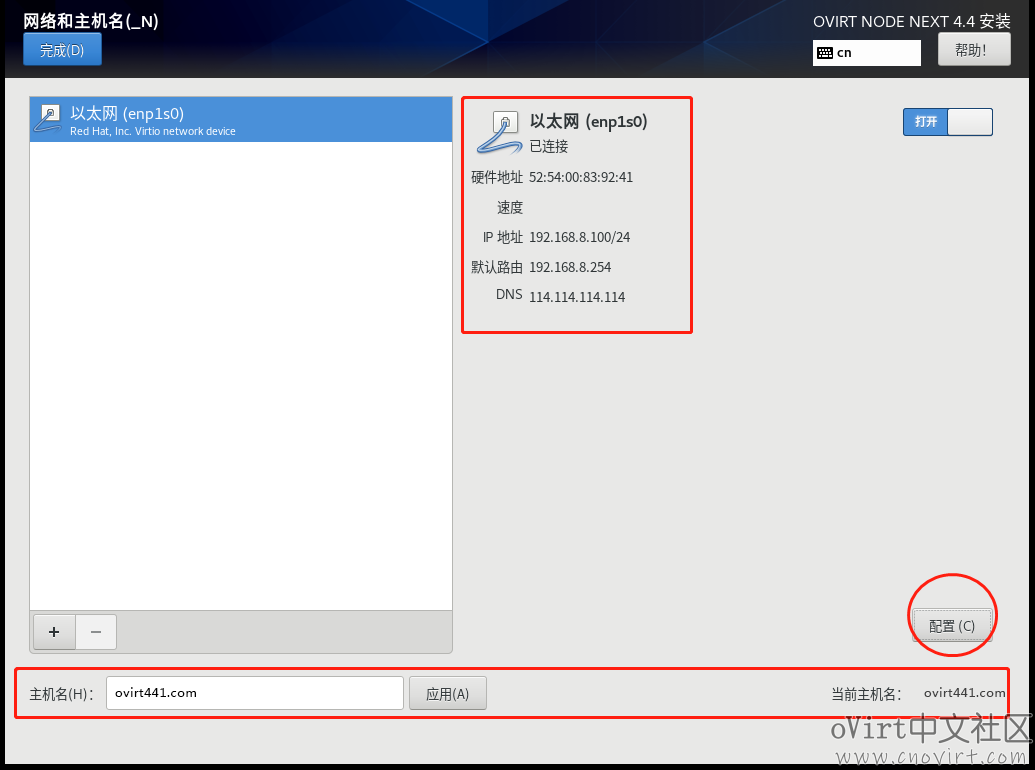
其中网络和主机名部分,要配置成静态IP地址,并设置好主机名(注意:主机名中不能有大写,否则后面会有证书问题);
安装系统过程中设置root密码;

安装完成后,重启系统;
使用root登录系统后,在/etc/hosts中添加主机名和IP的映射,如下:

第二步,通过dnf(yum)安装engine
到/etc/yum.repos.d/目录下将除CentOS-Sources.repo、CentOS-Media.repo外的其它所有CentOS开头的源中的enabled值改成1,如下:

将ovirt-4.4.repo、ovirt-4.4-dependencies.repo中的所有的“includepkgs”配置注释掉,如:
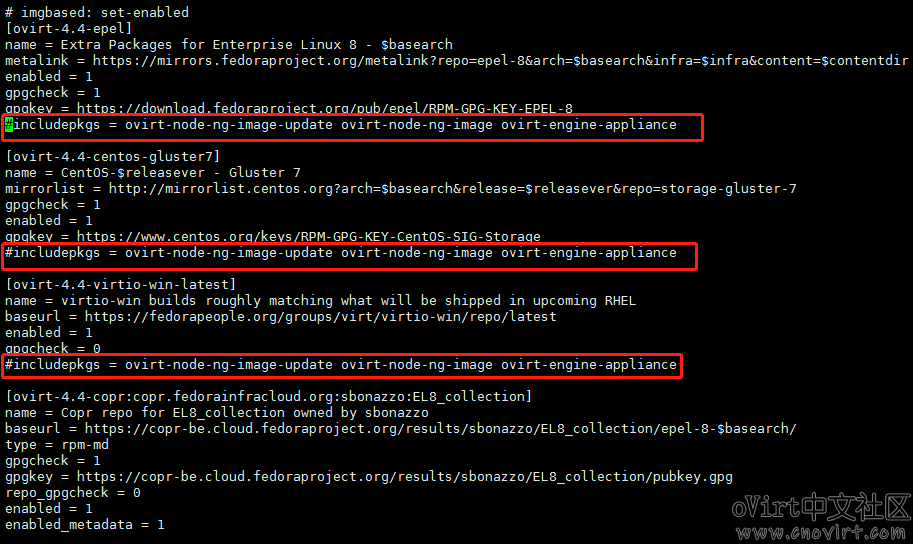
将/etc/dnf/plugins/versionlock.conf中的enabled值改成0,如:

好,下面可以通过dnf(yum)安装ovirt-engine了,先安装ovirt的软件源和开启必需的模块,执行以下命令:
# dnf install https://resources.ovirt.org/pub/yum-repo/ovirt-release44.rpm # dnf module -y enable javapackages-tools # dnf module -y enable pki-deps # dnf module -y enable postgresql:12
安装ovirt-engine,执行以下命令:
# dnf -y install ovirt-engine
这个过程时间比较长,有可能失败,因为需要下载包,有的rpm包比较大,容易超时,多试几次。
安装完成后,将语言环境改成英文,执行以下命令:
localectl set-locale.utf8
将/etc/ovirt-imageio/conf.d/50-vdsm.conf移动到/root/目录下(engine-setup完成后再移回来),执行以下命令:
mv /etc/ovirt-imageio/conf.d/50-vdsm.conf /root/
可以执行engine-setup了,除了admin密码需要输入外,其它全部默认值敲回车即可;(admin如果是弱密码的话会让你确认)
[root@oVirt441 conf.d]# engine-setup [ INFO ] Stage: Initializing [ INFO ] Stage: Environment setup Configuration files: /etc/ovirt-engine-setup.conf.d/10-packaging-jboss.conf, /etc/ovirt-engine-setup.conf.d/10-packaging.conf, /etc/ovirt-engine-setup.conf.d/20-setup-ovirt-post.conf Log file: /var/log/ovirt-engine/setup/ovirt-engine-setup-20200917142013-k2hc7m.log Version: otopi-1.9.2 (otopi-1.9.2-1.el8) [ INFO ] Stage: Environment packages setup [ INFO ] Stage: Programs detection [ INFO ] Stage: Environment setup (late) [ INFO ] Stage: Environment customization--== PRODUCT OPTIONS ==--[ INFO ] ovirt-provider-ovn already installed, skipping.--== PACKAGES ==--[ INFO ] Checking for product updates... [ INFO ] No product updates found--== NETWORK CONFIGURATION ==-- [WARNING] Failed to resolve oVirt441.com using DNS, it can be resolved only locally Setup can automatically configure the firewall on this system. Note: automatic configuration of the firewall may overwrite current settings. Do you want Setup to configure the firewall? (Yes, No) [Yes]: [ INFO ] firewalld will be configured as firewall manager. --== DATABASE CONFIGURATION ==-- The detected DWH database size is 24.85240077972412 MB. Setup can backup the existing database. The time and space required for the database backup depend on its size. This process takes time, and in some cases (for instance, when the size is few GBs) may take several hours to complete. If you choose to not back up the database, and Setup later fails for some reason, it will not be able to restore the database and all DWH data will be lost. Would you like to backup the existing database before upgrading it? (Yes, No) [Yes]: Perform full vacuum on the oVirt engine history database ovirt_engine_history@localhost? This operation may take a while depending on this setup health and the configuration of the db vacuum process. See https://www.postgresql.org/docs/10/sql-vacuum.html (Yes, No) [No]: --== OVIRT ENGINE CONFIGURATION ==-- Perform full vacuum on the engine database engine@localhost? This operation may take a while depending on this setup health and the configuration of the db vacuum process. See https://www.postgresql.org/docs/10/sql-vacuum.html (Yes, No) [No]: --== STORAGE CONFIGURATION ==-- --== PKI CONFIGURATION ==-- --== APACHE CONFIGURATION ==-- --== SYSTEM CONFIGURATION ==-- --== MISC CONFIGURATION ==-- --== END OF CONFIGURATION ==-- [ INFO ] Stage: Setup validation During execution engine service will be stopped (OK, Cancel) [OK]: [WARNING] Less than 16384MB of memory is available [ INFO ] Cleaning stale zombie tasks and commands --== CONFIGURATION PREVIEW ==-- Default SAN wipe after delete : False Host FQDN : oVirt441.com Firewall manager : firewalld Update Firewall : True Set up Cinderlib integration : False Engine database host : localhost Engine database port : 5432 Engine database secured connection : False Engine database host name validation : False Engine database name : engine Engine database user name : engine Engine installation : True PKI organization : com Set up ovirt-provider-ovn : True Grafana integration : True DWH database host : localhost DWH database port : 5432 DWH database secured connection : False DWH database host name validation : False DWH database name : ovirt_engine_history DWH database user name : ovirt_engine_history Grafana database user name : ovirt_engine_history_grafana Configure WebSocket Proxy : True DWH installation : True Backup DWH database : True Configure VMConsole Proxy : True Please confirm installation settings (OK, Cancel) [OK]: [ INFO ] Cleaning async tasks and compensations [ INFO ] Unlocking existing entities [ INFO ] Checking the Engine database consistency [ INFO ] Stage: Transaction setup [ INFO ] Stopping engine service [ INFO ] Stopping ovirt-fence-kdump-listener service [ INFO ] Stopping dwh service [ INFO ] Stopping vmconsole-proxy service [ INFO ] Stopping websocket-proxy service [ INFO ] Stopping service: grafana-server [ INFO ] Stage: Misc configuration (early) [ INFO ] Stage: Package installation [ INFO ] Stage: Misc configuration [ INFO ] Upgrading CA [ INFO ] Updating OVN SSL configuration [ INFO ] Backing up database localhost:ovirt_engine_history to '/var/lib/ovirt-engine-dwh/backups/dwh-20200917142052.iw87ld6v.dump'. [ INFO ] Creating/refreshing DWH database schema [ INFO ] Configuring WebSocket Proxy [ INFO ] Backing up database localhost:engine to '/var/lib/ovirt-engine/backups/engine-20200917142107.5q1thu8i.dump'. [ INFO ] Creating/refreshing Engine database schema [ INFO ] Creating/refreshing Engine 'internal' domain database schema Unregistering existing client registration info. [ INFO ] Install selinux module /usr/share/ovirt-engine/selinux/ansible-runner-service.cil [ INFO ] Generating post install configuration file '/etc/ovirt-engine-setup.conf.d/20-setup-ovirt-post.conf' [ INFO ] Stage: Transaction commit [ INFO ] Stage: Closing up [ INFO ] Starting service: grafana-server [ INFO ] Starting engine service [ INFO ] Starting dwh service [ INFO ] Starting Grafana service [ INFO ] Restarting ovirt-vmconsole proxy service --== SUMMARY ==-- [ INFO ] Restarting httpd Web access is enabled at: http://oVirt441.com:80/ovirt-engine https://oVirt441.com:443/ovirt-engine Internal CA 3E:E8:AD:97:81:1D:95:87:0B:09:8C:28:BF:1B:5D:3B:B8:3D:47:77 SSH fingerprint: SHA256:GpLaX5Y1y7EhiY//IJ/86SQpcPGqdYfurWfqsNpJQMA [WARNING] Less than 16384MB of memory is available Web access for grafana is enabled at: https://oVirt441.com/ovirt-engine-grafana/ Please run the following command on the engine machine oVirt441.com, for SSO to work: systemctl restart ovirt-engine --== END OF SUMMARY ==-- [ INFO ] Stage: Clean up Log file is located at /var/log/ovirt-engine/setup/ovirt-engine-setup-20200917142013-k2hc7m.log [ INFO ] Generating answer file '/var/lib/ovirt-engine/setup/answers/20200917142252-setup.conf' [ INFO ] Stage: Pre-termination [ INFO ] Stage: Termination [ INFO ] Execution of setup completed successfully
将50-vdsm.conf移动回原地方,执行以下命令:
mv /root/50-vdsm.conf /etc/ovirt-imageio/conf.d/
engine setup成功后,到本机(将要用来访问engine门户的机器)上,在/etc/hosts里增加oVirt441.com的域名映射,如下:

(windows下的路径为C:\Windows\System32\drivers\etc\hosts,linux下的路径为/etc/hosts)
然后就可以在浏览器中通过域名访问engine了:(此处也可以配置成通过IP访问,具体见https://www.cnovirt.com/archives/715)
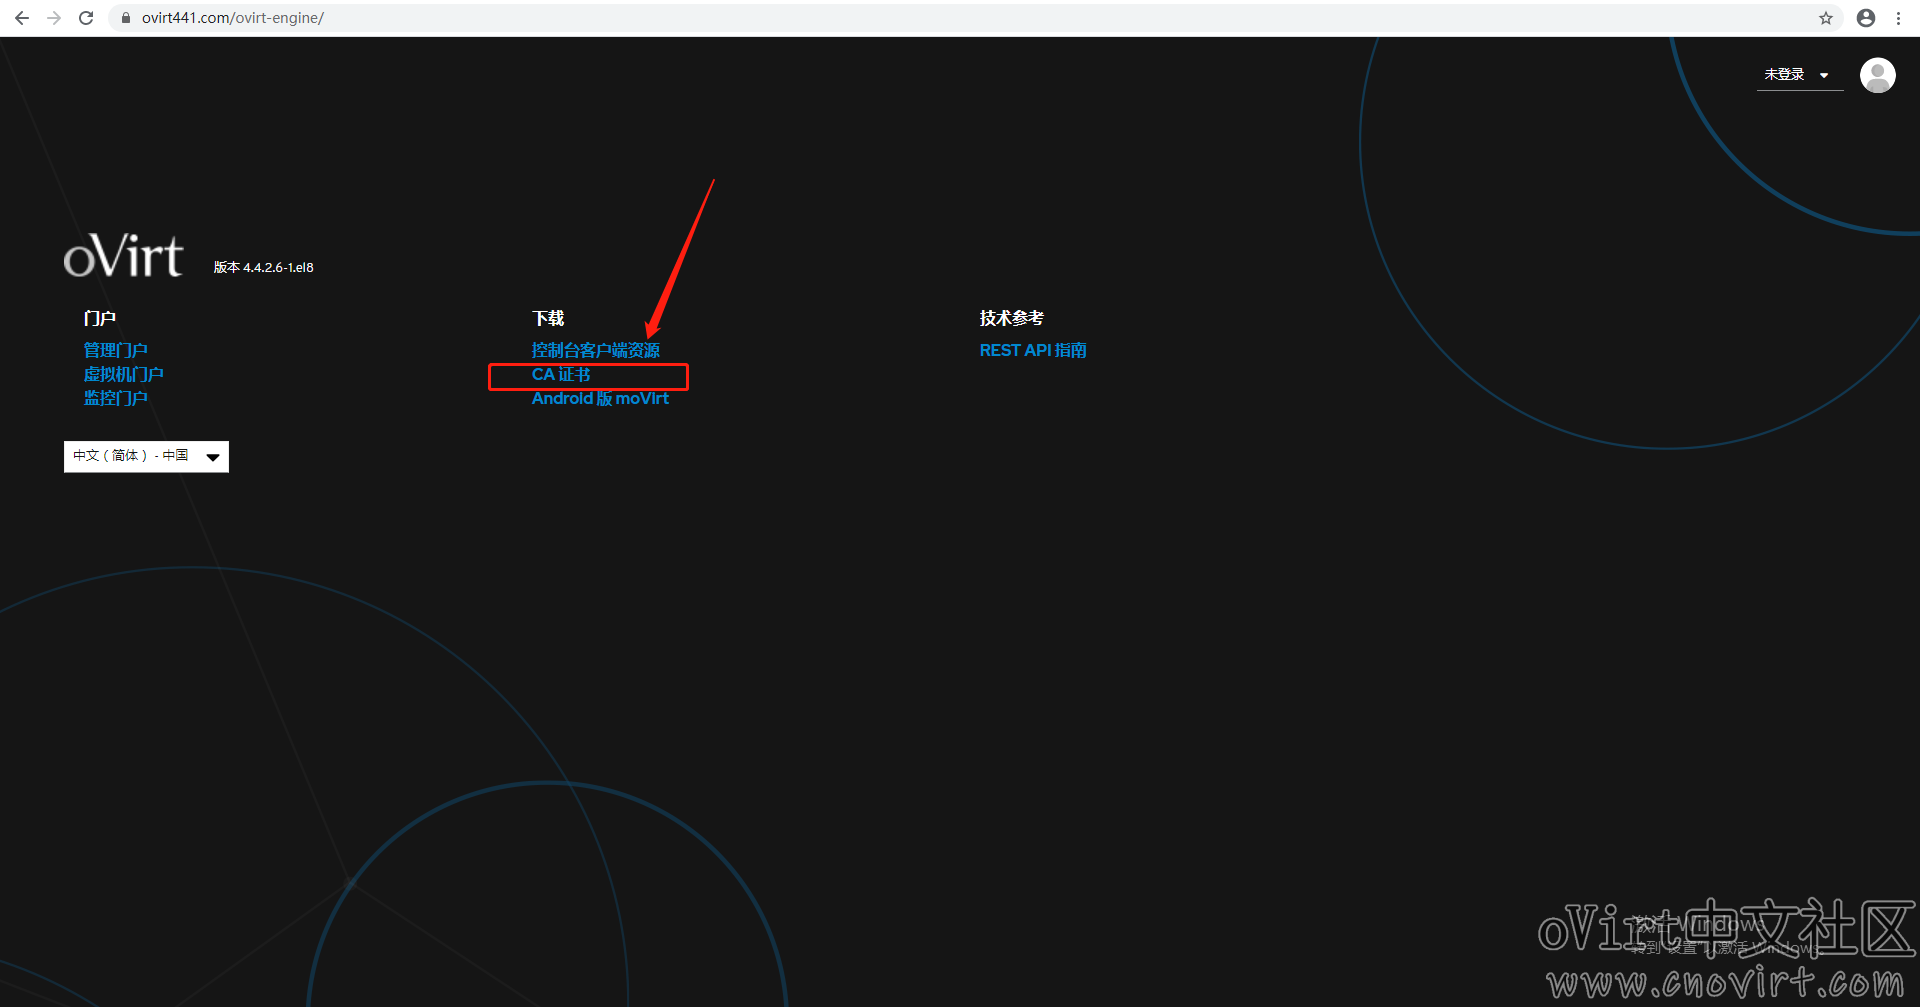
https://ovirt441.com,注意是https。
在engine门户页面,点击“CA证书”下载下来,导入到浏览器中;(如果是在win10下使用chrome浏览器,双击证书文件,点击安装证书,根据向导导入即可,注意证书存储选择“受信任的根证书颁发机构”);
导入证书后,后续再访问engine门户就不会每次都弹出不安全的网站链接的提示了;

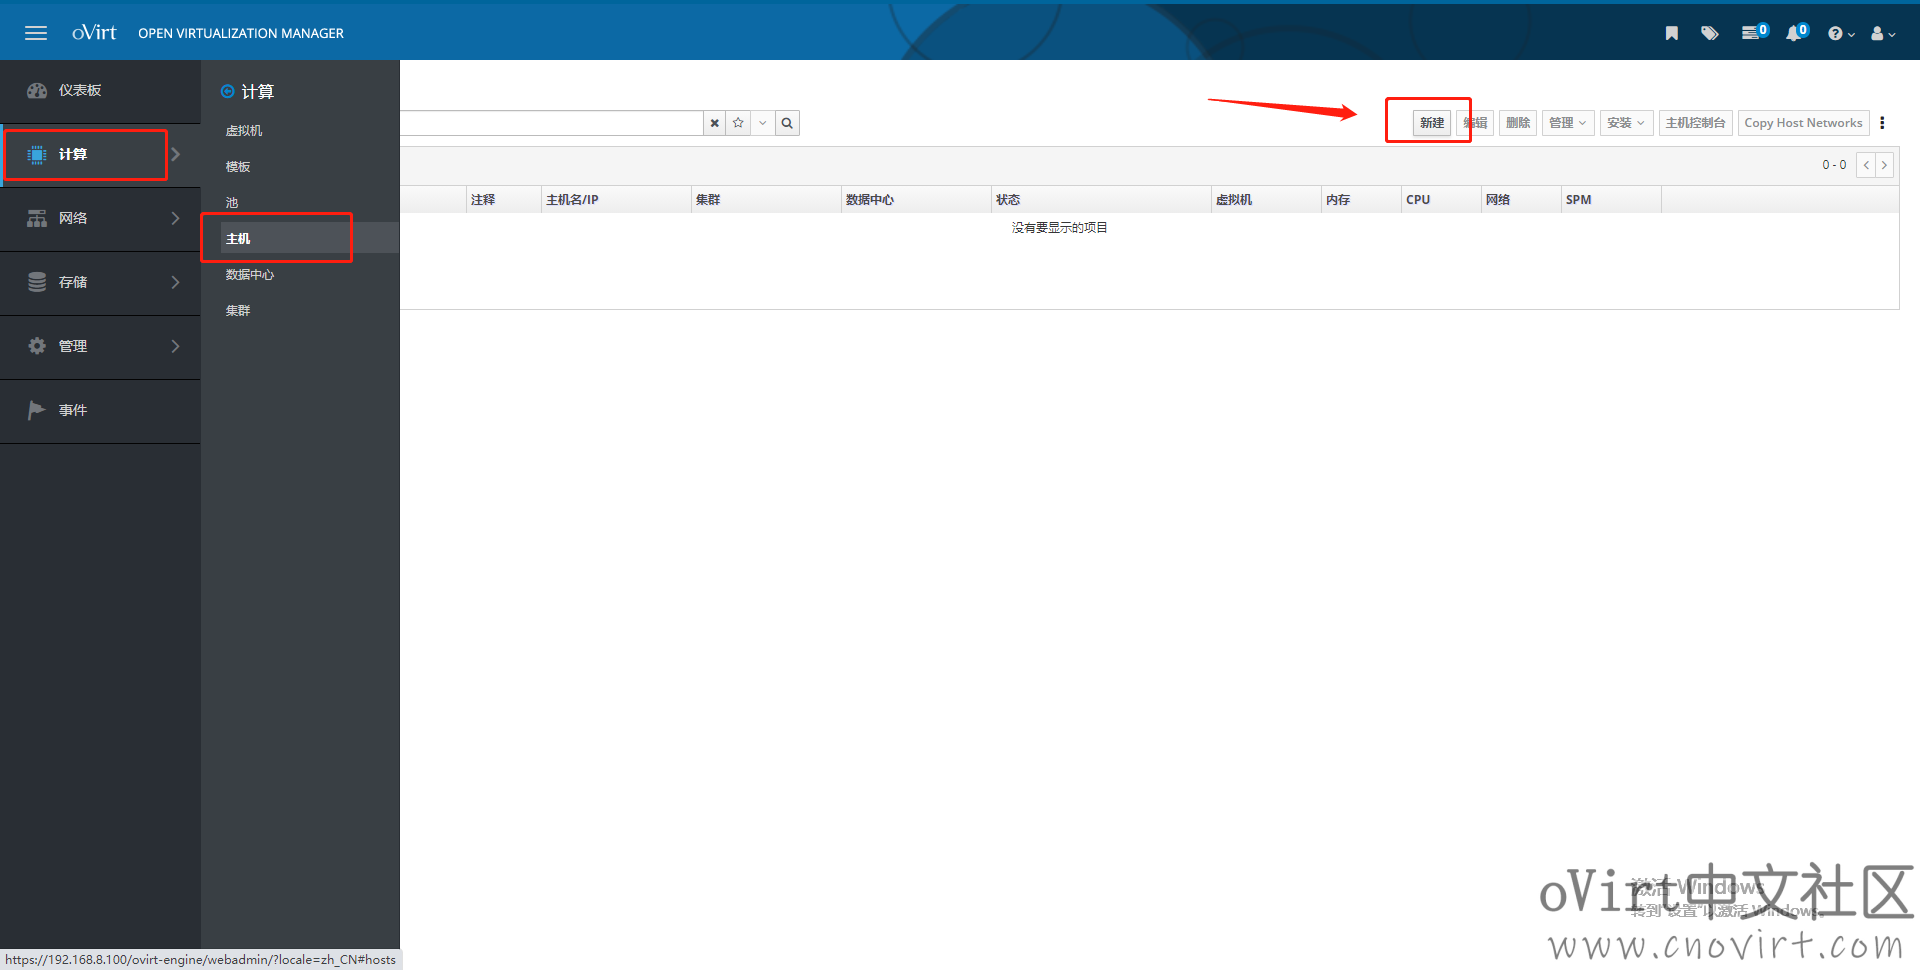
第三步,在engine中添加host
登录到engine管理门户中,进入主机列表页面,点击“新建”按钮,如下:
在新建主机窗口中,输入名称、主机名和密码,点“确认”,如下:

弹出的电源管理提示直接点“确认”即可,等待主机添加完成,如下:

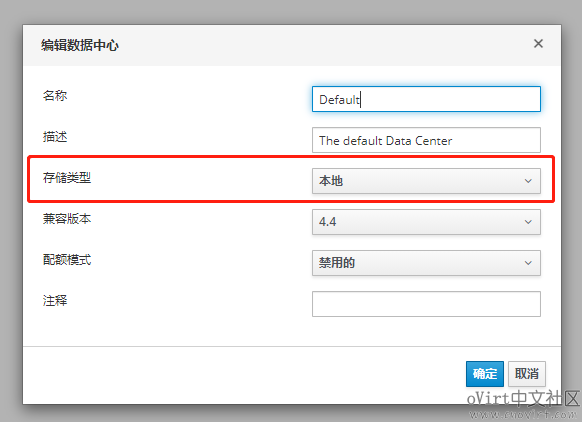
第四步,创建存储域
到数据中心列表页面,选中defaut数据中心,点击“编辑”按钮,如下:

在编辑对话框中,将存储类型由“共享”改为“本地”,如下:
到存储域列表页面,点击“新建域”按钮,如下:

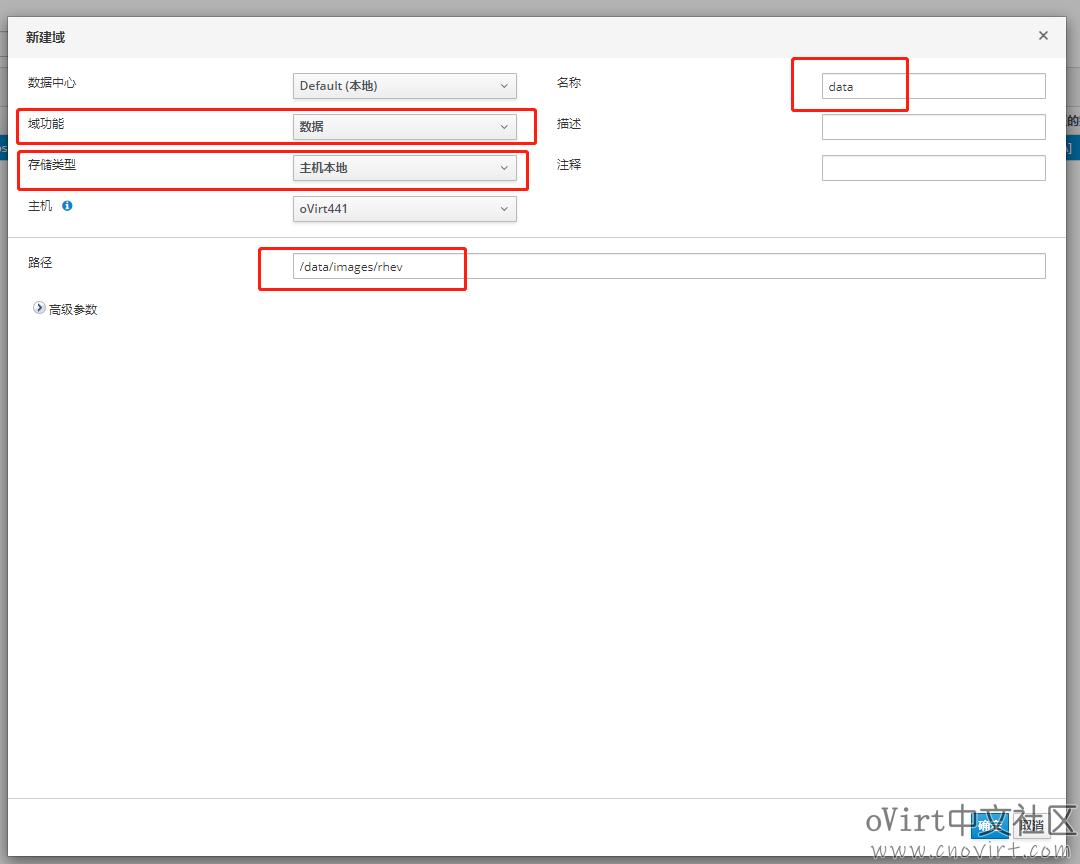
在新建域窗口,域功能选择“数据”,存储类型选择“主机本地”,为存储域起个名称,例如“data”,路径中填写“/data/images/rhev”(注意这个路径是node系统自带的且赋好权限的,直接填写即可),如下图:
第五步,上传ISO镜像
(注意这里用的方法是新建ISO存储域,不是直接通过浏览器上传ISO的方法,原因是直接上传时发现有一个问题还没具体排查[(*/ω\*)])
先ssh到host上,在/data/images/路径下建立一个isos目录,并将其权属设置为vdsm:kvm,如下:
cd /data/images/ mkdir isos chown vdsm:kvm isos
然后到存储域页面,新建ISO存储域,如下:

在弹出的对话框中,输入名称“isos”,域功能选择“ISO”,存储类型选择“主机本地”,路径填写“/data/images/isos”,如下:

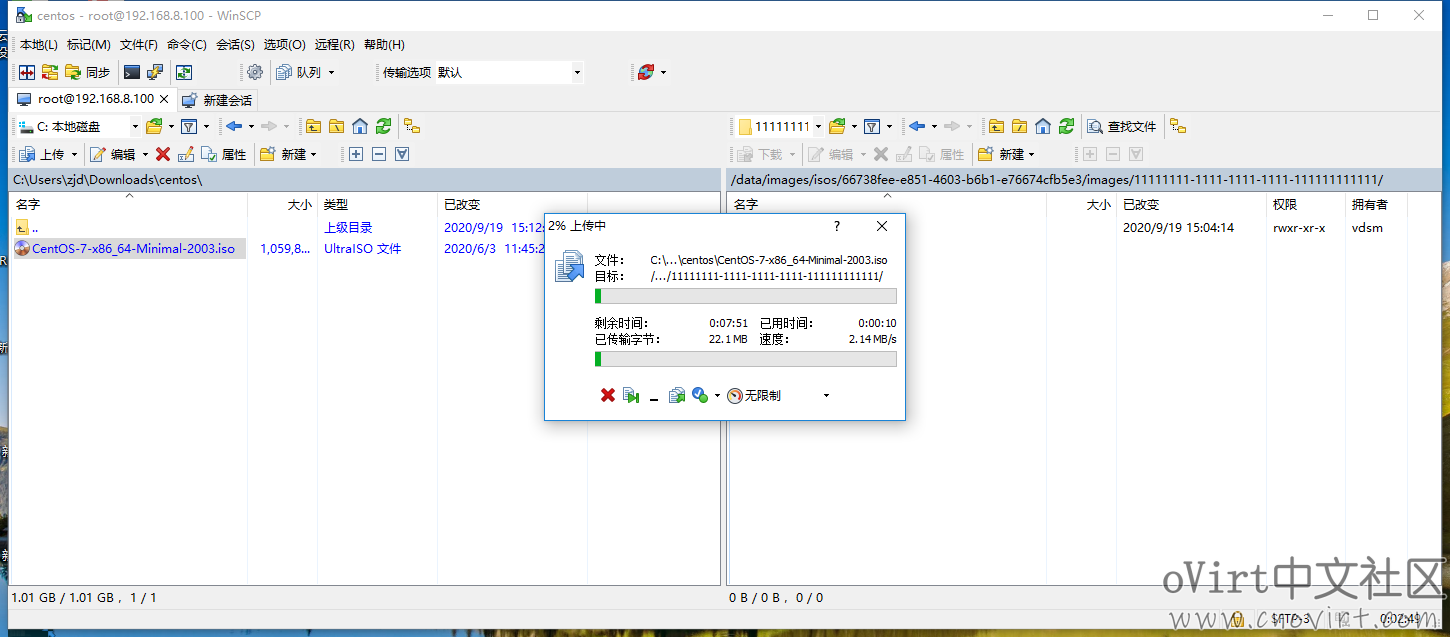
等待新建域完成,然后通过scp等工具将要上传ISO镜像传输到路径“/data/images/isos/66738fee-e851-4603-b6b1-e76674cfb5e3/images/11111111-1111-1111-1111-111111111111”下即可(注意isos后面的部分每个环境生成的可能不一样,但是“1111……”这一串是固定的),如下:
上传完成之后,就可以在我们建的ISO域的镜像标签页面下面看到了,如下:

第六步,新建虚机
先安装virt-viewer软件(从本站安装包下载或其它渠道获取),windows下直接下载后双击运行安装即可;
然后到虚机列表页面,点击“新建”按钮,如下:

在新建虚拟机对话框的普通标签页面,选择操作系统类型,因为我们之前上传的是centos7的iso镜像,这里选择RHEL7x64,然后取个虚机名称,在下面网卡nic1那里选择默认的ovirtmgmt网络,如下:

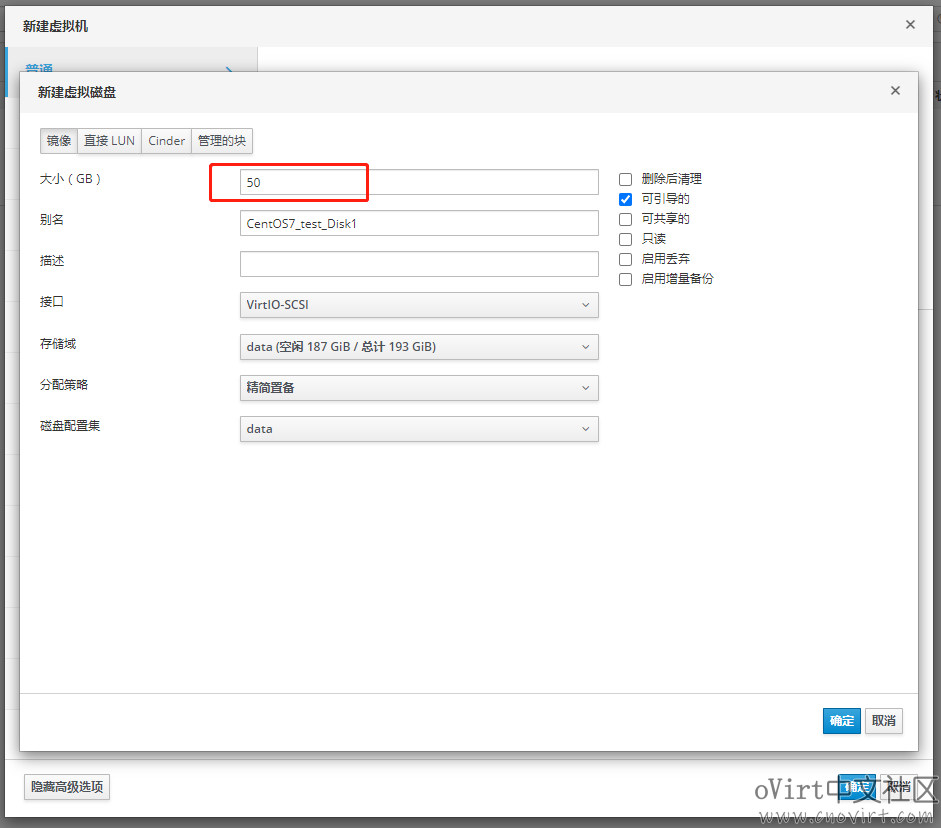
然后在实例镜像那里,点击“创建”按钮,弹出创建磁盘对话框,输入要创建的磁盘大小,如下:
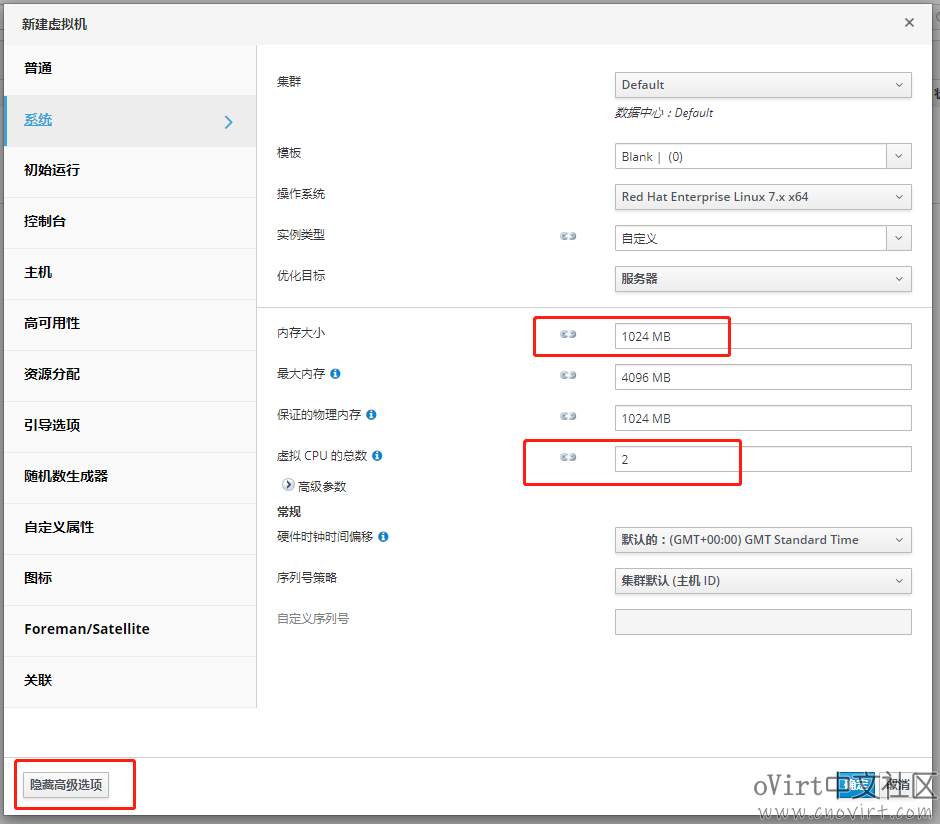
点确定后,到新建虚拟机对话框的系统标签页面(先点击下面的显示高级选项),填入内存大小和虚拟CPU数,如下:
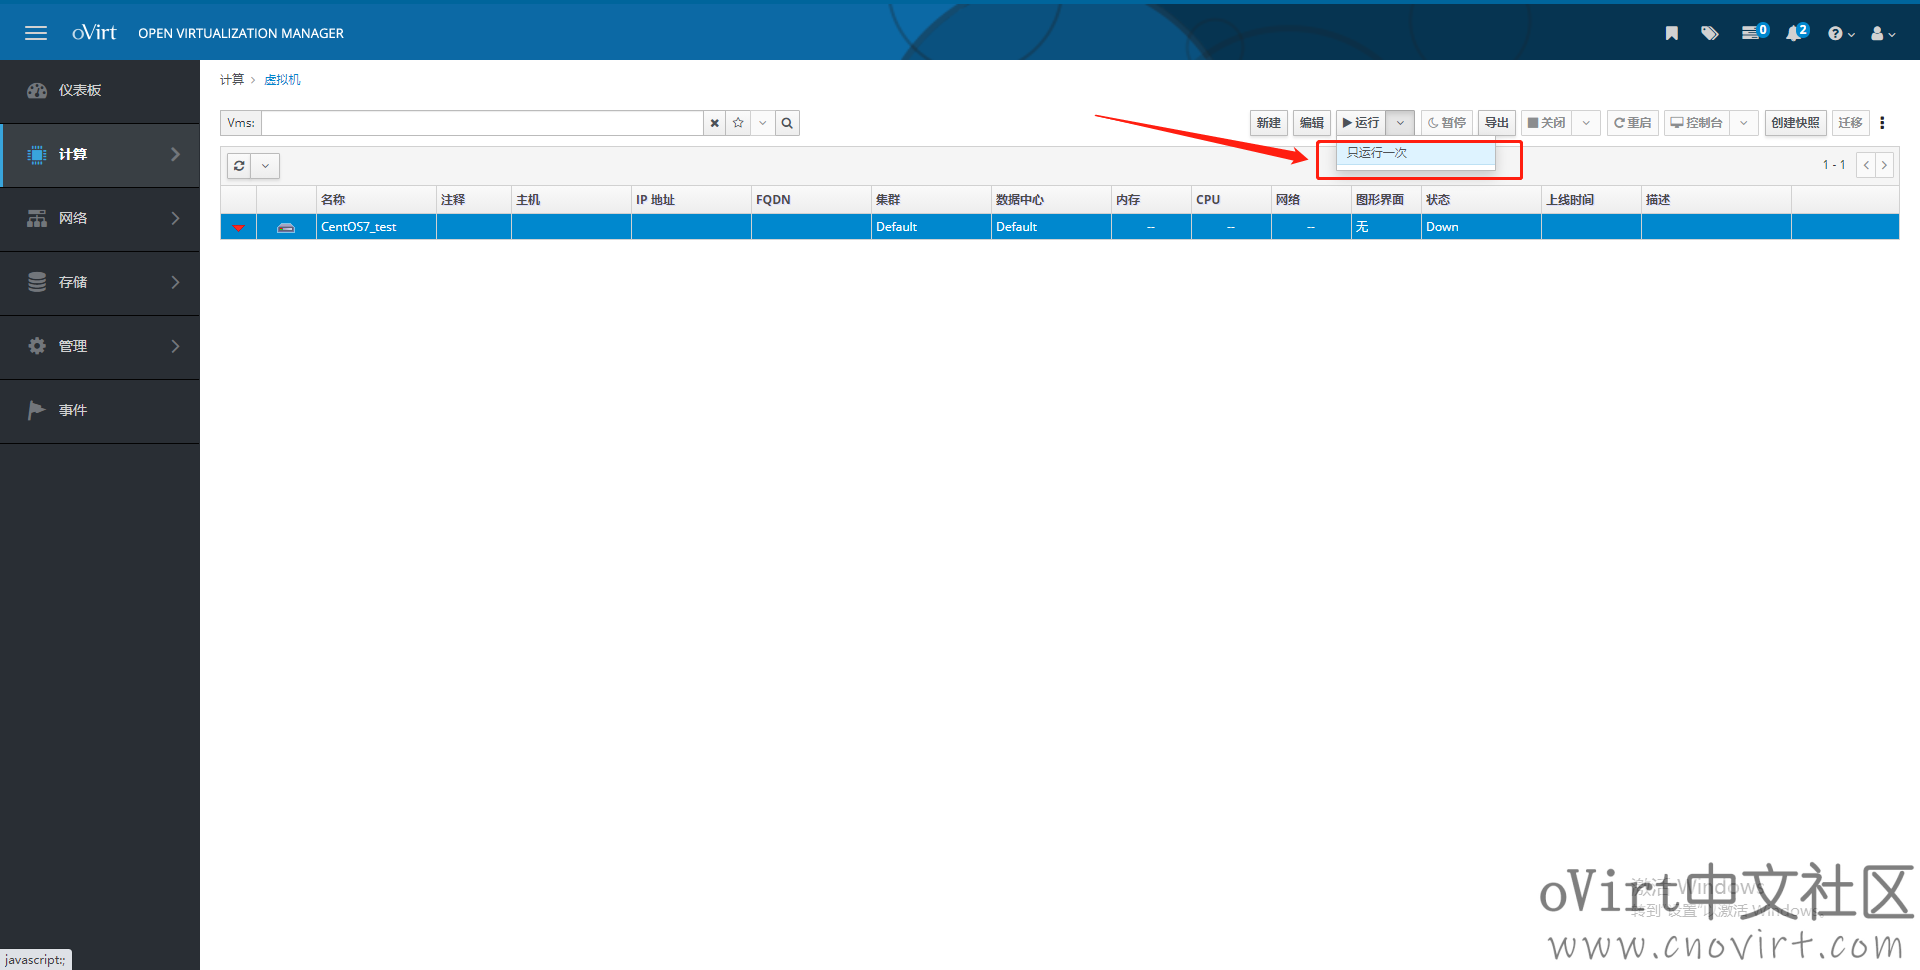
点确定后,选中刚才创建的虚机,点击操作按钮中的“只运行一次”(在运行的下拉列表中,只运行一次功能在安装系统时很有用,关机后下次再启动所做配置将还原,比如这里修改的从CD引导,下一次重新启动时自动恢复成从磁盘启动了),如下:
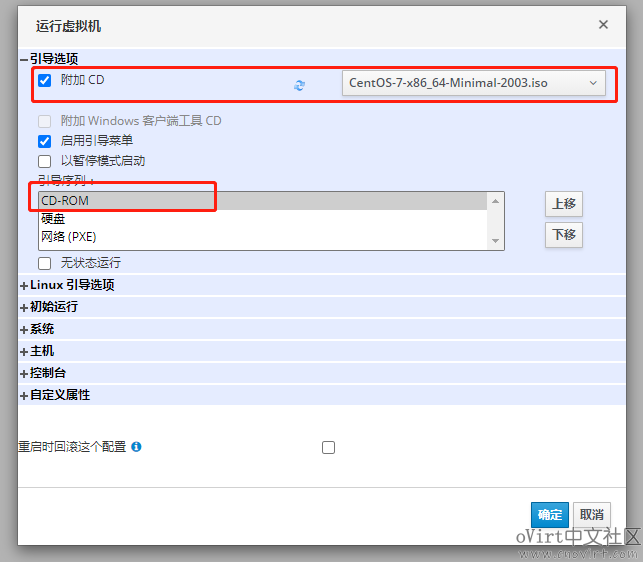
在弹出的对话框中,选中“附加CD”,选择我们之前上传的centos7镜像,调整下面的引导顺序,将CD-ROM放在第一位,如下:
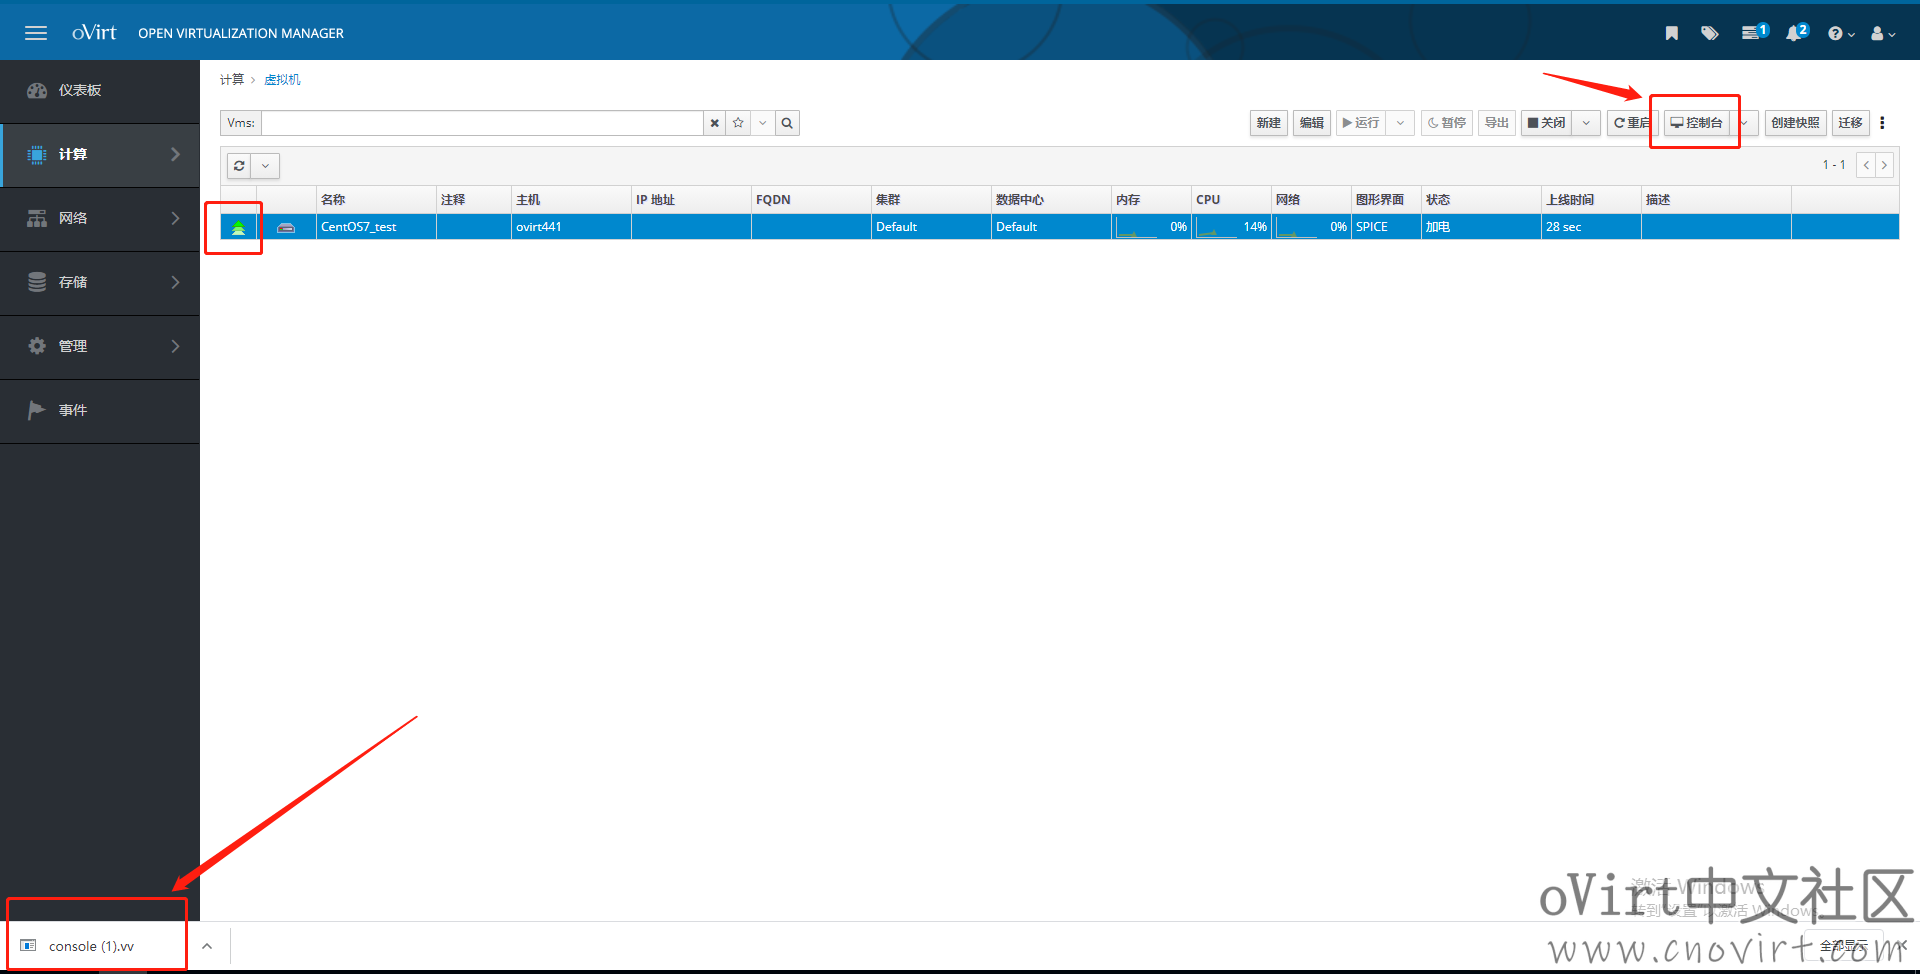
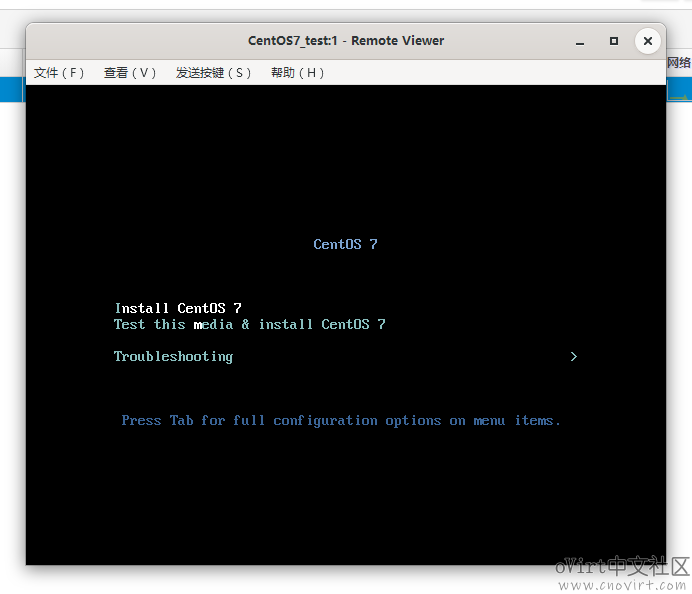
点确定后,进入虚机列表页面,当虚机处于加电状态时,即状态图标变成绿色的向上箭头时,即可点击操作栏的“控制台”按钮,此时会从浏览器下载得到一个console.vv文件,点击打开即可(注意前面安装virt-viewer的步骤一定要做),即能访问到虚机画面,执行后续安装系统的操作,如下:


上篇:
Centos8.2安装oVirt-engine V4.4.1
下篇:
ovirt-engine的备份和恢复
1 智能目标检测:用 Rust + dora-rs + yolo 构建“机器之眼” 2 大模型无非就这点东西 3 一天做出短剧App:我的MCP极速流 4 我用ai员工自动运营Google,登顶并收8k美金 5 网络故障秒排指南:10 个实战命令从入门到精通 6 Echo:还在用“旁路由”?All in One主机才是未来:PVE+OpenW... 7 男人若想发大财,就莫要去打工,我推荐做这二十件事。 8 运维必备:掌握这3个存储技术 9 2025年性价比最高的AI服务器拆解:768GB显存暴打训练慢的痛点 10 win11 连接共享打印机报错:0x00000040 或者 .709或者 .11... 11 7大热门Agent框架盘点:助你轻松构建多智能体AI应用 12 IT运维服务方案V3.0【拿来即用】