今天,我们将挑战高性能开发的极限——告别 Python 的束缚,直接拥抱底层性能,通过 Rust 语言,结合新兴的机器人数据流框架 dora-rs 和极致轻量化的机器学习库 Candle ,从零打造一个具备原生性能、极低延迟的“机器之眼”。
01 为什么是 Rust + dora-rs + Candle?
在构建高性能的机器人或智能体系统时,我们常面临三个核心痛点: 模块间的通信延迟 、 多语言协同 和 推理速度 。
三者结合的核心优势在于:
1. 极速通信与数据流管理 (dora-rs)
零拷贝 (Zero-Copy) :
dora-rs利用 Apache Arrow 内存格式作为其核心数据结构。这意味着当节点间传递大块数据(如 4K 图像或传感器数据)时,无需进行昂贵的内存复制。它仅传递 指针和元数据 ,将通信延迟降至最低。模块解耦 :
dora-rs将整个系统解耦为数据流节点,极大地简化了系统设计和调试,告别了传统机器人系统中复杂的线程、锁和消息队列。
2. 极致性能与 AI 加速 (Rust + Candle)
Rust 的性能优势 :作为系统语言,Rust 提供了 C/C++ 级的性能,同时通过其严格的所有权系统确保了内存安全和线程安全。
轻量级 AI 引擎 (Candle) :
Candle是 Hugging Face 出品的一款基于 Rust 的极简机器学习框架。相比 PyTorch 或 TensorFlow,它具有 无 Python 依赖、体积小、运行快 的特点,非常适合嵌入式和边缘计算。
3. 多语言混合与业务协同
无缝协作 :
dora-rs天生支持多语言混合编程。开发者可以使用 Rust 处理对延迟要求极高的高性能视觉和底层控制逻辑,同时使用 Python 处理复杂的业务逻辑、数据分析或快速迭代。二者通过dora-rs的数据流通道进行高效、安全地通信。
02 系统设计
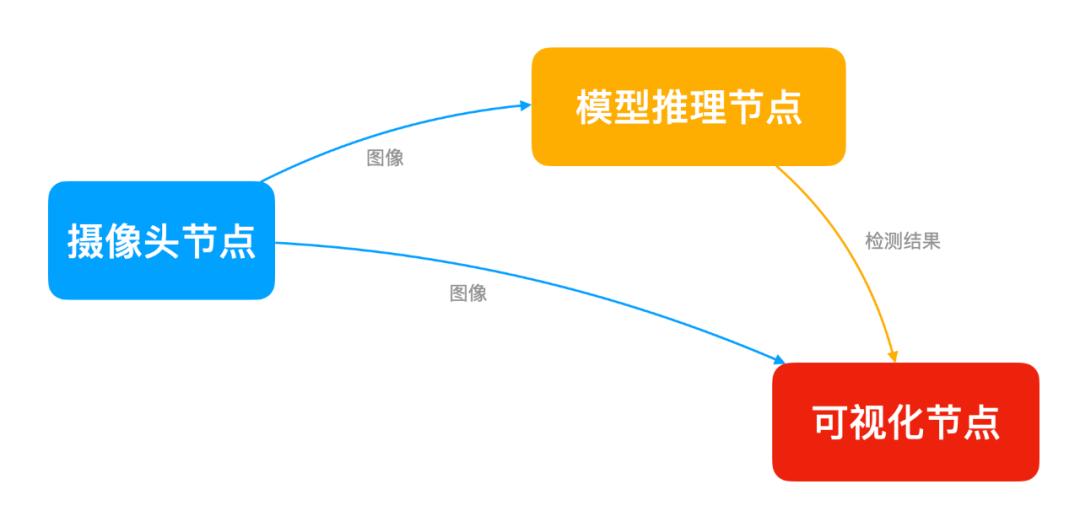
我们要实现的目标很明确: 摄像头采集 -> AI 大脑分析 -> 屏幕可视化 。在 dora-rs 中,我们将系统拆解为三个独立的 节点 (Node) :
Camera Node (摄取) :负责“看见”世界,读取摄像头帧。
Inference Node (大脑) :负责“思考”,运行
YOLO模型进行目标检测。Plotter Node (可视化) :负责“表达”,将检测框和标签画在屏幕上。
03 环境准备
在开始写代码前,我们需要配置 Mac M1 的开发环境。
1. 安装 OpenCV M1 芯片建议使用 Homebrew 安装 ARM64 版本的 OpenCV,这是处理视频流的基础。
brew install opencv
2. 安装 Rust 与 dora-rs 工具链
# 安装 Rust
curl --proto '=https' --tlsv1.2 -sSf https://sh.rustup.rs | sh
# 安装 Dora 命令行工具
cargo install dora-cli
3. 创建项目
使用 dora new 命令创建项目和节点。
# 创建项目
dora new --lang rust dora-yolo-rust
# 创建节点# 摄像头节点dora new --kind node --lang rust webcam
# yolo目标检测节点dora new --kind node --lang rust object_detection
# 可视化节点dora new --kind node --lang rust viewer
项目结构:
dora-yolo-rust/
├── Cargo.toml # Workspace配置
├── dataflow.yml # 数据流定义
├── webcam/ # 摄像头节点
│ ├── Cargo.toml
│ └── src/main.rs
└── viewer/ # 可视化节点
├── Cargo.toml
└── src/main.rs
└── object_detection/ # yolo目标检测节点
├── Cargo.toml
└── src/main.rs
04 核心代码实战:分步构建
我们将代码逻辑拆解为三个步骤,每个步骤对应一个节点。
第一步:构建“眼睛” (Camera Node)
这个节点只做一件事:从摄像头读取数据并发送出去。
核心逻辑实现:
初始化
dora-rs节点。使用 OpenCV 打开 0 号设备(FaceTime 摄像头)。
循环读取帧,压缩或调整尺寸后通过
send_output发送。
步骤1:初始化 dora-rs 节点
usedora_node_api::{DoraNode, Event};
usestd::error::Error;
fnmain ->ResultBoxdynError>> {
// 从环境变量初始化节点,自动连接 dora 协调器
let(mutnode,mutevents) = DoraNode::init_from_env?;
}
步骤2:打开 Mac 摄像头
useopencv::{
core::{Vector}, imgcodecs, prelude::*, videoio::{self, VideoCapture}
};fnmain ->ResultBoxdynError>> {
let(mutnode,mutevents) = DoraNode::init_from_env?;
letmutcamera = VideoCapture::new(CAMERA_INDEX, videoio::CAP_ANY)
.context("Failed to create video capture")?;
letoutput = DataId::from("frame".to_owned);
// 尝试打开摄像头
if!VideoCapture::is_opened(&camera).context("Failed to check if camera is open")? {
// 在 Mac M1 上,有时需要延迟以确保摄像头初始化完成
thread::sleep(Duration::from_millis(500));
if!VideoCapture::is_opened(&camera).context("Camera still not open after delay")? {
returnErr("Could not open camera 0 or check its status.".into);
}}// 尝试设置分辨率 (可选,可以提高性能或稳定性)
// camera.set(videoio::CAP_PROP_FRAME_WIDTH, 640.0)?;
// camera.set(videoio::CAP_PROP_FRAME_HEIGHT, 480.0)?;
}
步骤3:循环读取帧
whileletSome(event) = events.recv {
// println!("Received event: {:?}", event);
matchevent {
Event::Input {id,metadata,data: _,
} =>matchid.as_str {
"tick" => {
// todo 读取帧
}other => eprintln!("Received input {:?}", other),
},_ => {}
}}
步骤4:编码并发送数据
letmutframe = Mat::default;
// 读取帧
ifcamera
.read(&mutframe)
.context("Failed to read frame from camera")?
{
ifframe.size.context("Failed to get frame size")?.width >0{
// 将帧编码为 JPEG 格式的字节向量
letmutbuffer = Vector::new;
imgcodecs::imencode(".jpg", &frame, &mutbuffer, &Vector::new)
.context("Failed to encode frame to JPEG")?;
// 发送原始帧数据
letstd_buffer:Vecu8> = buffer.into_iter.collect;
// 3. 再转为 Arrow 数组
letarrow_array = UInt8Array::from(std_buffer);
node.send_output(output.clone,metadata.parameters,arrow_array,)?;}}
完整代码 :
https://github.com/Doomking/rust-zhixingshe-examples/blob/main/dora/dora-yolo-rust/webcam/src/main.rs
第二步:构建“大脑” (Inference Node)
这是系统的核心。我们将加载 YOLOv8 模型,对输入图像进行目标检测。
核心逻辑实现:
初始化节点 :从环境变量初始化 dora-rs 节点。
加载模型 :从本地文件加载
YOLOv8模型。图像预处理 :将接收到的图像字节流转换为 Tensor,并归一化 (0-1)。
运行模型推理 :执行
model.forward。解析推理结果 : 解析模型输出,生成
bboxes检测结果。
步骤1:初始化节点
usedora_node_api::{DoraNode, Event};
fnmain ->ResultBoxdynError>> {
let(mutnode,mutevents) = DoraNode::init_from_env?;
}
步骤2:加载 YOLO 模型
// 提前下载模型: https://hf-mirror.com/lmz/candle-yolo-v8/tree/main
// 模型名称:yolov8n.safetensors
// 大小:6.4MB
println!("Loading YOLOv8 model...");
letdevice = select_device.unwrap;
// 定义本地模型文件的路径
letcurrent_dir = env::current_dir.context("Failed to get current working directory")?;
// 定义相对路径
letrelative_path = Path::new("object_detection/models/yolov8n.safetensors");
// 尝试合并路径并检查
letlocal_model_path = current_dir.join(relative_path);
// 验证文件是否存在(可选,但推荐)
if!local_model_path.exists {
returnErr(format!("Model file not found at: {}", local_model_path.display).into);
}
letmodel_file = local_model_path;
// 加载权重
letvb =unsafe{ VarBuilder::from_mmaped_safetensors(&[model_file], DType::F32, &device)? };
letmodel = YoloV8::load(vb, Multiples::n,80)?;
步骤3:图像预处理
// 图像预处理:调整大小、填充、归一化、转 Tensor
fnpreprocess_image(
frame: &Mat,
device: &Device,
) ->Resultf32,f32,f32),BoxdynError>> {
letwidth = frame.cols;
letheight = frame.rows;
// 计算缩放比例,保持长宽比
letratio = (MODEL_SIZEasf32/ width.max(height)asf32).min(1.0);
letnew_w = (widthasf32* ratio)asi32;
letnew_h = (heightasf32* ratio)asi32;
// Resize
letmutresized = Mat::default;
imgproc::resize(frame,&mutresized,
opencv::core::Size::new(new_w, new_h),0.0,
0.0,
imgproc::INTER_LINEAR,)?;// Letterbox padding (填充灰色背景到 640x640)
letdw = (MODEL_SIZEasi32- new_w) /2;
letdh = (MODEL_SIZEasi32- new_h) /2;
letmutpadded = Mat::default;
copy_make_border(&resized,&mutpadded,
dh,MODEL_SIZEasi32- new_h - dh, // top, bottom
dw,MODEL_SIZEasi32- new_w - dw, // left, right
opencv::core::BORDER_CONSTANT,Scalar::new(114.0,114.0,114.0,0.0), // YOLO 灰色背景
)?;// BGR -> RGB
letmutrgb = Mat::default;
imgproc::cvt_color(&padded,&mutrgb,
imgproc::COLOR_BGR2RGB,0,
AlgorithmHint::ALGO_HINT_DEFAULT,)?;// 转为 Vec
letdata_vec:Vecu8> = rgb.data_bytes?.to_vec;
// 转为 Candle Tensor: (Batch, Channel, Height, Width)
// 原始数据是 HWC (640, 640, 3),需要转为 CHW 并归一化 0-1
lettensor = Tensor::from_vec(data_vec, (MODEL_SIZE, MODEL_SIZE,3), device)?
.permute((2,0,1))? // HWC -> CHW
.to_dtype(DType::F32)?
.affine(1. /255.,0.)? // 归一化
.unsqueeze(0)?; // 添加 Batch 维度 -> (1, 3, 640, 640)
Ok((tensor, ratio, dwasf32, dhasf32))
}
步骤4:运行模型推理
// 解码 JPEG 数据成 Mat
letframe = imgcodecs::imdecode(&buffer, imgcodecs::IMREAD_COLOR)
.context("Failed to decode image from buffer")?;
// --- 步骤 A: 图像预处理 (OpenCV -> Candle Tensor) ---
let(processed_tensor, ratio, pad_w, pad_h) =
preprocess_image(&frame, &device)?;
// --- 步骤 B: 模型推理 ---
letpredictions = model.forward(&processed_tensor)?;
// --- 步骤 C: 后处理 (NMS) ---
// predictions 维度通常是 (1, 84, 8400) -> (Batch, Classes+Coords, Anchors)
letpreds = predictions.squeeze(0)?;
let(bboxes, keypoints) = report_detect(&preds, &frame, ratio, pad_w, pad_h)?;
letarrow_array = bboxes_to_arrow(bboxes)?;
node.send_output(output.clone, metadata.parameters, arrow_array)?;
步骤5:解析推理结果
/// 解析推理结果
/// YOLOv8 Output: [batch, 84, 8400] (xc, yc, w, h, class0...class79)
fnreport_detect(
pred: &Tensor,
original_frame: &Mat,
ratio:f32,
pad_w:f32,
pad_h:f32,
) ->ResultVec'staticstr, Rect,f32)>,OptionVec>),BoxdynError>> {
// 1. 转置为 [8400, 84] 便于处理
letpred = pred.t?;
let(n_preds, _n_coords) = pred.dims2?;
letpred_vec:VecVecf32>> = pred.to_vec2?; // 获取数据到 CPU
letmutresults =Vec::new;
foriin0..n_preds {
letrow = &pred_vec[i];
// 找出最高分的类别 (前4个是坐标,后面是类别)
letscores = &row[4..];
let(max_score_idx, max_score) =
scores
.iter
.enumerate
.fold(
(0,0.0_f32),
|(idx, max), (i, &val)| {
ifval > max {
(i, val)
}else{
(idx, max)
}
},
);
ifmax_score > CONFIDENCE_THRESHOLD {
// 解析坐标 (cx, cy, w, h) -> 模型输入坐标系
letcx = row[0];
letcy = row[1];
letw = row[2];
leth = row[3];
// 转换回原图坐标 (去除 padding 并除以缩放比例)
letx = ((cx - w /2.0- pad_w) / ratio).max(0.0);
lety = ((cy - h /2.0- pad_h) / ratio).max(0.0);
letwidth = (w / ratio).min(original_frame.colsasf32- x);
letheight = (h / ratio).min(original_frame.rowsasf32- y);
results.push((
LABELS[max_score_idx],
Rect::new(xasi32, yasi32, widthasi32, heightasi32),
max_score,
));
}
}
// 简单 NMS (非极大值抑制)
// 注意:生产环境建议使用 torchvision 或 opencv 自带的 NMSBoxes
letmutkept_results =Vec::new;
results.sort_by(|a, b| b.2.partial_cmp(&a.2).unwrap); // 按置信度降序
whileletSome(current) = results.pop {
kept_results.push(current.clone);
// 移除 IOU 大于阈值的框
results.retain(|item| iou(¤t.1, &item.1)
}
Ok((kept_results,None))
}完整代码 :
https://github.com/Doomking/rust-zhixingshe-examples/blob/main/dora/dora-yolo-rust/object_detection/src/main.rs
第三步:构建“画布” (Plotter Node)
最后,我们需要将接收的图像和检测结果,绘制并实时显示在窗口中。
核心逻辑实现:
初始化节点与窗口
订阅双路数据流
接收检测结果
显示图像
步骤1:初始化节点与窗口
usedora_node_api::{DoraNode, Event};
useopencv::{prelude::*, imgcodecs, imgproc, highgui};
usestd::error::Error;
fnmain ->ResultBoxdynError>> {
let(mut_node,mutevents) = DoraNode::init_from_env?;
// 初始化一个空的检测框缓存
letmutbboxes =Vec::new;
// 创建一个用于显示的窗口
highgui::named_window("Dora Webcam Viewer (Rust)", highgui::WINDOW_NORMAL)
.context("Failed to create highgui window")?;
println!("Viewer operator initialized.");
}
步骤2:订阅双路数据流
whileletSome(event) = events.recv {
matchevent {
Event::Input {id,metadata: _,
data,} =>matchid.as_str {
"detections" => {
letstruct_array = data
.as_any.downcast_ref::.context("Input is not a StructArray (expected bboxes)")?;
letreceived_bboxes = arrow_to_bboxes(struct_array)?;
bboxes = received_bboxes;}"frame" => {
// 将接收到的字节数据转换为 OpenCV Vector
// 1. 将 Arrow trait 对象强转为具体的 UInt8Array
letuint8_array = data
.as_any
.downcast_ref::
.context("Arrow data is not UInt8Array (expected byte array)")?;
// 2. 提取 UInt8Array 的字节切片
letbyte_slice = uint8_array.values; // 返回 &[u8]
// 3. 转换为 OpenCV Vector
letbuffer = Vector::from_slice(byte_slice);
// 解码 JPEG 数据成 Mat
letframe = imgcodecs::imdecode(&buffer, imgcodecs::IMREAD_COLOR)
.context("Failed to decode image from buffer")?;
ifframe
.size
.context("Failed to get decoded frame size")?
.width
>0
{
......
// 显示图像
highgui::imshow("Dora Webcam Viewer (Rust)", &display_frame)
.context("Failed to imshow frame")?;
// 必须调用 wait_key 来处理 GUI 事件
highgui::wait_key(1).context("Failed to wait_key")?;
}
}
other => eprintln!("Received input `{other}`"),
},
_ => {}
}
}
步骤3:绘制检测结果
// --- 在原图上绘制结果 ---
letmutdisplay_frame = frame.clone;
letbboxes_clone = bboxes.clone;
for(classname, bbox, conf)inbboxes_clone {
// 画框
imgproc::rectangle(&mutdisplay_frame,
bbox,Scalar::new(0.0,255.0,0.0,0.0), // 绿色
2,
imgproc::LINE_8,0,
)?;// 写标签
letlabel =format!("{}: {:.2}", classname, conf);
imgproc::put_text(&mutdisplay_frame,
&label,Point::new(bbox.x, bbox.y -5),
imgproc::FONT_HERSHEY_SIMPLEX,1.0,
Scalar::new(0.0,255.0,0.0,0.0),
1,
imgproc::LINE_8,false,
)?;}
步骤4:显示图像
// 显示图像
highgui::imshow("Dora Webcam Viewer (Rust)", &display_frame)
.context("Failed to imshow frame")?;
// 必须调用 wait_key 来处理 GUI 事件highgui::wait_key(1).context("Failed to wait_key")?;
完整代码 :
https://github.com/Doomking/rust-zhixingshe-examples/blob/main/dora/dora-yolo-rust/viewer/src/main.rs
05 注入灵魂:数据流图 (Dataflow Graph)
通过 YAML 文件定义数据流文件 dataflow.yaml 。
这就像电路板的设计图,定义了数据如何从一个节点流向另一个节点:
nodes:
-id:webcam
build:cargobuild-pwebcam
path:target/debug/webcam
inputs:
tick:dora/timer/millis/100
outputs:
-frame
-id:object_detection
build:cargobuild-pobject_detection
path:target/debug/object_detection
inputs:
frame:webcam/frame
outputs:
-detections
-id:viewer
build:cargobuild-pviewer
path:target/debug/viewer
inputs:
detections:object_detection/detections
frame:webcam/frame
数据流向图如下:
06 启动与效果验证
一切准备就绪,编译并启动你的“机器之眼”:
# 编译 构建数据流图
dora build dataflow.yml
# 运行数据流
dora run dataflow.yml
输出
object_detection: DEBUG daemon::spawner spawning node
viewer: DEBUG daemon::spawner spawning node
webcam: DEBUG daemon::spawner spawning node
INFO dora daemon finished building nodes, spawning.........webcam: DEBUG spawner spawned node with pid ProcessId(Some(51833))
webcam: INFO daemon node is ready
viewer: INFO daemon node is ready
object_detection: INFO daemon node is ready
INFO daemon all nodes are ready, starting dataflow
object_detection: stdout Loading YOLOv8 model...
object_detection: stdout  Using CPU device.
viewer: stdout Viewer operator initialized.
object_detection: stdout Model loaded successfully.
效果时刻 :
写在最后
通过本项目,我们不仅体验了 Rust 带来的极致性能和内存安全,更见证了 dora-rs 如何将复杂的智能体系统拆解为优雅、高效的模块化数据流。这为构建高性能、高可靠性的实时系统提供了坚实的基础。
并且,此实时目标检测系统具备强大的可扩展性,可轻松应用于以下场景:
场景 | 核心优势 | 技术路径 |
|---|---|---|
| 边缘设备部署 | 构建轻量化、低功耗的智能摄像头。 | 利用 dora-rs 的跨平台特性,将系统移植到 树莓派 4B 等边缘设备。 |
| 多目标跟踪 | 实现视频流中对多个物体运动轨迹的持续追踪和分析。 | 在目标检测结果基础上,集成 DeepSORT 等关联算法。可应用于交通监控、行为分析,提供连续识别与追踪能力。 |
| 具身智能与控制 | 实现视觉引导的精准操作,如工业机械臂抓取。 | 将检测到的目标 坐标信息 实时转换为机械臂的 抓取指令 。 |
附录:参考资料
dora-rs 官方文档 :https://dora-rs.ai/
candle 框架 :
https://github.com/huggingface/candleyolov8 模型 :
https://hf-mirror.com/lmz/candle-yolo-v8完整代码 :
https://github.com/Doomking/rust-zhixingshe-examples/tree/main/dora/dora-yolo-rust


上篇:
AI应用快速原型开发:FastAPI + htmx ——无需React,为了快!
下篇:
剖析Mini-SGLang,打开LLM推理引擎的黑盒世界
1 AI智能体后端落地:场景+原理+实战,告别Demo式应用 2 电商必懂的数据公式 3 AI新玩法,制作历史大事件视频,涨粉20w,获赞220w 4 2026年人工智能领域,这些岗位急需大量人才 5 用AI全流程制作历史故事短剧,保姆级教程,零基础上手 6 2026 年 AI 创业全景指南:给渴望借 AI 逐梦的人! 7 用AI自动生成爆款文案的完整流程 8 人工智能 AI 在电商全链条的12个主要应用场景 9 信息差搬砖:用AI把小红书火帖变“付费文档”,日入500+ 10 地理空间AI应用:YOLO vs. SAM 11 AI应用快速原型开发:FastAPI + htmx ——无需React,为了快 12 剖析Mini-SGLang,打开LLM推理引擎的黑盒世界